Spring Data is a sub-project of the popular Spring Framework, which aims to simplify the development of data access layers in Java applications. Spring Data provides a unified and consistent API for accessing different types of data stores, such as relational databases, NoSQL databases, and even in-memory data structures.
Introduction:
Spring Data is a sub-project of the popular Spring Framework, which aims to simplify the development of data access layers in Java applications. Spring Data provides a unified and consistent API for accessing different types of data stores, such as relational databases, NoSQL databases, and even in-memory data structures.
In this blog, we will explore Spring Data and how it can be integrated with Spring Boot. We will also build a small application that uses Spring Data to perform CRUD operations on a database.
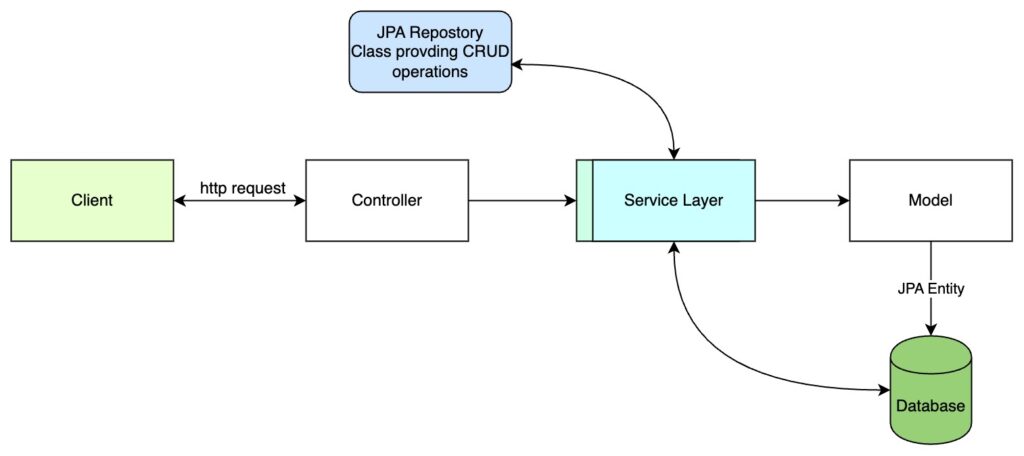
Spring Boot Architecture Flow

Prerequisites:
Before we start, make sure you have the following installed:
- Java Development Kit (JDK) 8 or higher
- Spring Boot CLI or Spring Tool Suite (STS)
- MySQL database (or any other database of your choice)
Getting Started:
To get started with Spring Data and Spring Boot, we will create a new Spring Boot project using the Spring Initializr. Open a terminal or command prompt and run the following command:
spring init --dependencies=web,data-jpa,mysql spring-data-exampleThis will create a new Spring Boot project with the necessary dependencies for web development, Spring Data JPA, and MySQL database support.
Now, open the project in your preferred IDE (such as STS) and navigate to the src/main/java directory. Here, you will find a file named SpringDataExampleApplication.java, which contains the main class of our Spring Boot application.
Creating a Model:
Before we can perform any CRUD operations, we need to create a model for our data. In this example, we will create a simple User class with an ID, name, and email address. Create a new Java class named User in the com.example.springdataexample package and add the following code:
@Entity
@Table(name = "users")
public class User {

    @Id
    @GeneratedValue(strategy = GenerationType.IDENTITY)
    private Long id;

    private String name;

    private String email;

    // getters and setters

}
Here, we have annotated the class with @Entity and @Table annotations to indicate that it represents a database table named users. We have also annotated the id field with @Id and @GeneratedValue annotations to indicate that it is the primary key of the table and that its value will be generated automatically.
Configuring the Database:
Next, we need to configure our database connection. Open the application.properties file in the src/main/resources directory and add the following code:
spring.datasource.url=jdbc:mysql://localhost:3306/mydb
spring.datasource.username=root
spring.datasource.password=password
spring.datasource.driver-class-name=com.mysql.jdbc.Driver
spring.jpa.hibernate.ddl-auto=update
spring.jpa.show-sql=true
spring.jpa.properties.hibernate.dialect=org.hibernate.dialect.MySQL5InnoDBDialect
Replace the spring.datasource.url value with the URL of your database, and replace the spring.datasource.username and spring.datasource.password values with your database username and password, respectively.
Creating a Repository:
Now that we have configured our database connection, we can create a repository to perform CRUD operations on our User model. Create a new Java interface named UserRepository in the com.example.springdataexample.repository package and add the following code:
@Repository
public interface UserRepository extends JpaRepository<User, Long> {

}
Here, we have extended the JpaRepository interface, which provides us with a set of predefined methods for performing CRUD operations on our User model. We have also annotated the interface with @Repository to indicate that it is a Spring Data repository.
Creating a Controller:
Finally, we can create a controller to handle HTTP requests and responses. Create a new Java class named UserController in the com.example.springdataexample.controller package and add the following code:
@RestController
@RequestMapping("/users")
public class UserController {

    @Autowired
    private UserRepository userRepository;

    @GetMapping("")
    public List<User> getAllUsers() {
        return userRepository.findAll();
    }

    @PostMapping("")
    public User createUser(@RequestBody User user) {
        return userRepository.save(user);
    }

    @GetMapping("/{id}")
    public User getUserById(@PathVariable Long id) {
        return userRepository.findById(id).orElse(null);
    }

    @PutMapping("/{id}")
    public User updateUser(@PathVariable Long id, @RequestBody User user) {
        user.setId(id);
        return userRepository.save(user);
    }

    @DeleteMapping("/{id}")
    public void deleteUser(@PathVariable Long id) {
        userRepository.deleteById(id);
    }

}
Here, we have annotated the class with @RestController and @RequestMapping annotations to indicate that it handles HTTP requests and responses and that its base URL is /users. We have also injected the UserRepository using the @Autowired annotation.
We have defined five methods for handling different types of requests:
getAllUsers()– Returns a list of all users in the database.createUser()– Creates a new user in the database.getUserById()– Returns a user with the specified ID from the database.updateUser()– Updates an existing user in the database.deleteUser()– Deletes a user with the specified ID from the database.
Running the Application:
Now that we have created our model, repository, and controller, we can run our application and test it. Open a terminal or command prompt and navigate to the root directory of the project. Then, run the following command:
./mvnw spring-boot:runThis will start our Spring Boot application, and we should see some output in the console indicating that our application has started successfully.
To test our application, we can use a tool such as Postman to send HTTP requests to our controller. For example, to create a new user, we can send a POST request to http://localhost:8080/users with the following JSON payload:
{
    "name": "John Doe",
    "email": "john.doe@example.com"
}
We should receive a response with the created user’s ID, name, and email address:
{
    "id": 1,
    "name": "John Doe",
    "email": "john.doe@example.com"
}
We can also send GET, PUT, and DELETE requests to retrieve, update, and delete users from the database.
Conclusion:
In this blog, we have explored Spring Data and how it can be integrated with Spring Boot to simplify the development of data access layers in Java applications. We have created a small application that uses Spring Data to perform CRUD operations on a database, and we have demonstrated how to test our application using HTTP requests. Spring Data provides a powerful and flexible API for accessing different types of data stores, and it can greatly simplify the development of complex data access layers in Java applications.


